
 hot topic
How To Build Your Dream PC Via PC Building Simulator

Ready to build a high-performance custom PC without risking expensive real-world components? In this guide, you’ll discover how to design, assemble, and test your ideal PC setup in PC Building Simulator, no prior hardware experience required. You’ll walk away with the skills to bring your dream PC build to life both in-game and for future real-world projects.
Why should you care about practicing PC building in a simulator first? Mastering the process virtually lets you experiment with premium parts, avoid costly mistakes, and learn at your own pace with zero pressure. But it's important to understand the core benefits and step-by-step workflow to get the most out of your practice sessions.
Why Building Your Dream PC via PC Building Simulator Is Worth Your Time
- Low-risk, no-cost learning: You can test hundreds of high-end CPU, GPU, and motherboard combinations without spending any money or damaging physical components. This makes it ideal for beginners who want to learn without worrying about expensive errors.
- Transferable real-world skills: The part compatibility rules, assembly order, and troubleshooting workflows in the game match real PC building processes almost exactly. The skills you learn here can directly apply when you build a physical PC later.
- Unlimited creative flexibility: You can mix and match rare, limited-edition components and custom RGB setups that may be hard to find or out of budget in real life. This lets you design a fully unique build that matches your exact style and performance needs.
- Portfolio and planning value: You can save screenshots and spec lists of your finished builds to reference for future real PC purchases, or share them with the PC building community to get feedback. It’s a great way to plan your next upgrade without guesswork.
Step-by-Step Guide to Building Your Dream PC via PC Building Simulator
Step 1: Define your build goals and budget
First, decide what you want to use your dream PC for, whether that’s 4K gaming, content creation, or a budget-friendly everyday setup. Set a virtual in-game budget to keep your part choices realistic for your use case. Common mistake to avoid: Don’t overspend on a top-tier GPU if you only plan to use the PC for basic web browsing, as it will waste your budget for other critical components.
Step 2: Select compatible core components
Start by picking your CPU, then choose a compatible motherboard, RAM, power supply, storage, and GPU that fit your performance needs. Use the game’s built-in compatibility checker to make sure all parts work together without conflicts. Pro tip: Prioritize your highest-use component first — for example, pick a high-end GPU first if you’re building a gaming-focused PC.
Step 3: Assemble the core internal components
First, install the CPU and CPU cooler onto the motherboard before placing the board into your chosen case. Next, mount the power supply, attach your RAM sticks to the motherboard slots, and install your storage drives in their designated bays. Common mistake to avoid: Don’t forget to apply thermal paste between the CPU and cooler, as this will cause overheating issues when you test the build later.
Step 4: Install the GPU and connect all cables
Slot your graphics card into the top PCIe slot on the motherboard, then run power cables from the power supply to the motherboard, CPU, GPU, and storage drives. Make sure all front-panel cables for power buttons, USB ports, and audio jacks are connected correctly. Pro tip: Route cables neatly along the back of the case to improve airflow and make your build look cleaner.
Step 5: Test your build and troubleshoot issues
Press the power button in the game to turn on your PC. If it boots successfully, run the built-in performance benchmark to check for overheating, stability issues, or performance gaps. If it fails to turn on, double-check all cable connections and make sure all components are seated correctly. Common mistake to avoid: Don’t skip the benchmark step, as it can catch small issues that may cause bigger problems later.
Step 6: Customize aesthetics and save your build
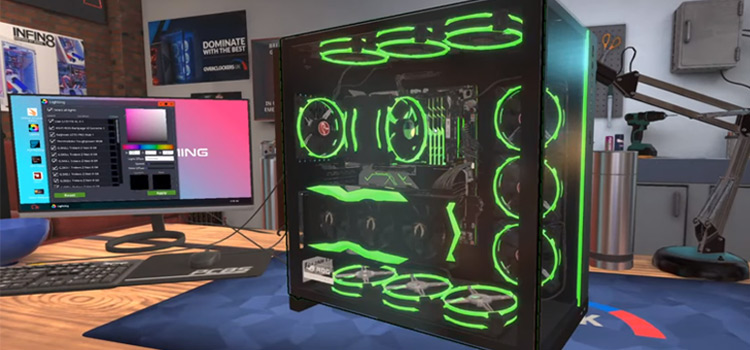
Once your build is stable, add custom RGB lighting, case fans, and decorative decals to match your preferred style. Save your final build spec list and take screenshots to reference later for real-world builds or to share with the community. Pro tip: You can upload your finished build to the in-game workshop to get feedback from other PC building enthusiasts.
Challenges to Be Aware Of
- Learning curve for part compatibility: New users may struggle to understand which components work together at first, leading to multiple failed build attempts. You can use the game’s built-in compatibility tool to flag issues early, and take time to research what each component does to build your knowledge over time.
- Slight differences from real-world builds: A small number of assembly steps and niche part restrictions in the game may not perfectly match real-world PC building processes. Always cross-reference your in-game build plans with real hardware guides if you plan to replicate the build physically later.
- Temptation to overspend on virtual parts: It’s easy to blow your virtual budget on unrealistic, top-tier components that are far out of your real-world price range. Try to stick to a budget that matches what you would actually spend on a physical PC to make your practice more useful for future real projects.
Conclusion
You now have the foundation to start building your dream PC in PC Building Simulator, even if you have no prior hardware experience. Every step you practice in the game builds skills that translate directly to real-world PC building, so you can approach future physical builds with confidence.
PC Building Simulator offers a risk-free space to experiment, learn, and iterate on your perfect PC design, and by mastering this process, you’re positioning yourself to make smarter, more cost-effective choices when you build a real PC later. You also get to express your creative side with custom aesthetic touches that make your build truly one of a kind.
Don’t wait for the perfect moment. Start planning your first virtual PC build today. You’ll be surprised how quickly you pick up the skills, and you’ll have a great time experimenting with different component combinations along the way.
FAQ
How long does it take to build a full PC in PC Building Simulator?
A basic build for beginners can take between 45 minutes to an hour to complete, including part selection, assembly, and testing. As you get more familiar with the process, you can finish a build in 20 to 30 minutes. Take your time for your first few builds to make sure you don’t skip any critical steps.
Do I need real PC building experience to use this guide?
No prior hardware experience is required at all, as the game includes clear tutorials and compatibility checks to guide you through every step. This guide is designed to walk you through the process from start to finish, regardless of your current skill level. Start with a simple budget build for your first attempt to get comfortable with the workflow.
What’s the best way to make sure my in-game build will work for a real PC?
First, note down all the part names and model numbers from your in-game build, then cross-check their compatibility on real hardware retailer websites. You can also compare the in-game benchmark results to real-world performance reviews to make sure the build meets your needs. Always double-check with a real PC building guide before purchasing physical components.
Can I share my finished builds with other PC Building Simulator players?
Yes, you can upload your completed builds to the game’s Steam Workshop, where other players can view, download, and even modify your designs. You can also share screenshots and spec lists on PC building forums and social media to get feedback from the broader hardware community. Join community build challenges to test your skills and get inspiration for new designs.


RECOMMEND ARTICLES
Most Read

How To Stay Hydrated Throughout The Day: Practical Tips For People Who Forget To Drink Water
How To Do Your Own Creation With AI Supporting: A Complete Step-by-Step Guide

How To Get Free Houses, Maps, Clothes, Furniture, And Pets In Toca

How To Get Roblox Secret Items: A Step-by-Step Guide For Players

How To Find Affordable Housing For Seniors: A Step-by-Step Guide